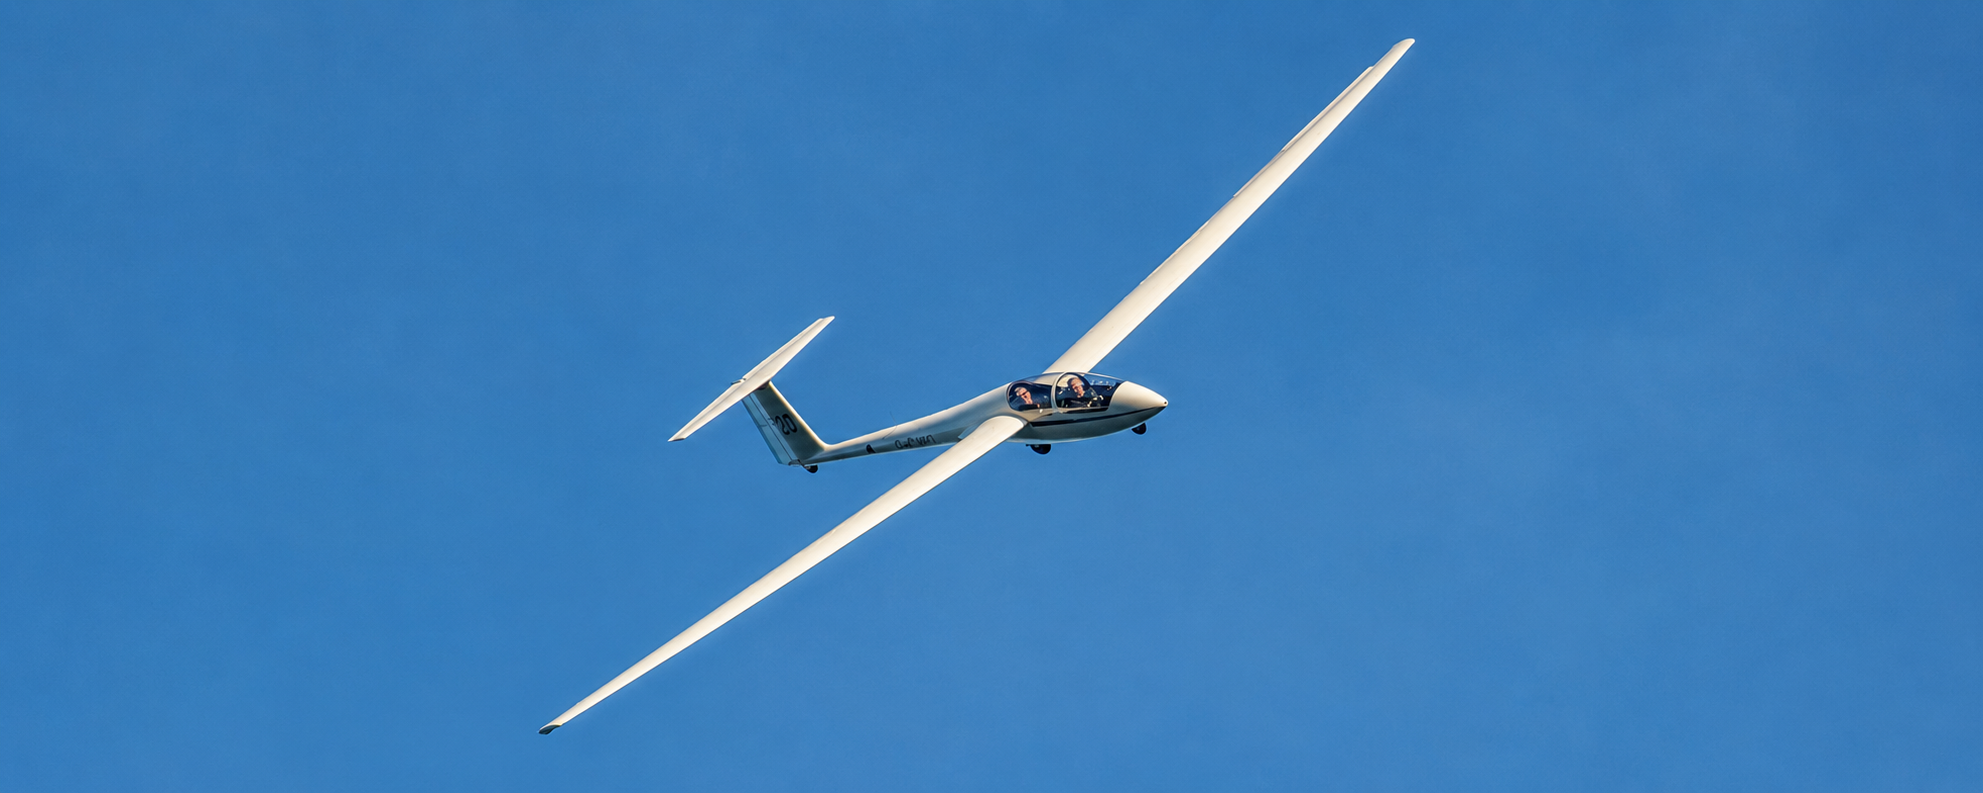

A glider can travel for miles without an engine, using rising air to remain airborne. But to explore a thermal, follow a cross country route or return towards an airfield, the pilot needs to understand how to turn efficiently.
From the ground, a turn looks simple. The wings tilt, the nose changes direction and the glider follows a curved path. In the cockpit, however, several things happen together. Lift changes direction, the wings can produce different amounts of drag, and the pilot must manage bank, yaw, pitch and airspeed.
Understanding these relationships is the foundation of good glider turning techniques. The aim is not simply to change direction. It is to make a coordinated turn while maintaining control of the glider and awareness of the surrounding airspace.
How Does a Glider Turn?
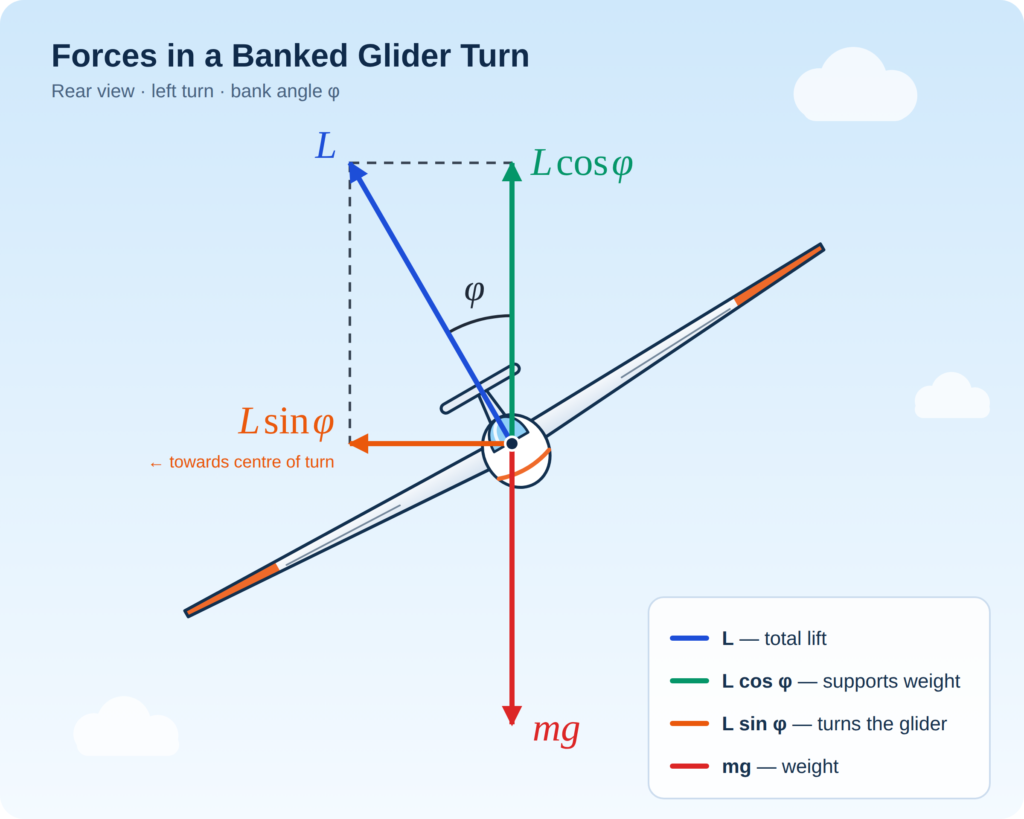
A glider turns primarily by banking its wings. When the wings are level, lift acts mainly upwards to oppose the glider’s weight. When the glider banks, the lift vector tilts with the wings.
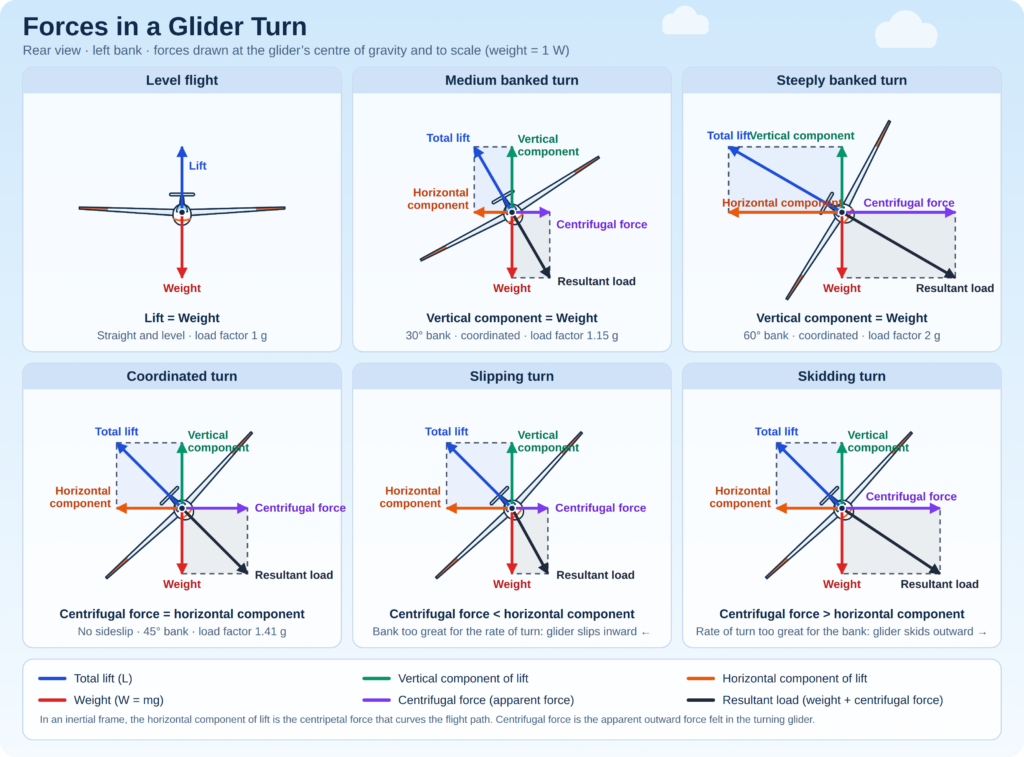
This tilted lift has two components. The vertical component supports the glider against gravity, while the horizontal component provides the force that curves the flight path.
Think of pushing a shopping trolley around a corner. To change direction, the trolley needs a force towards the inside of the turn. In a glider, the horizontal component of banked lift provides that force.
The rudder helps coordinate the turn, but it is not the primary control that makes the glider follow a curved path. That role belongs to the banked lift.
Understanding the Three Main Flight Controls
A glider uses three primary flight controls to manage its attitude and direction. Each has a different job, but all three work together during a turn.
Ailerons: Controlling the Bank
The ailerons control roll. When the pilot moves the control stick sideways, the ailerons normally deflect in opposite directions.
One aileron moves down while the other moves up. This changes the lift produced by the two wings, causing the glider to roll towards the selected bank.
For example, to begin a left turn, the pilot applies left aileron input to establish a left bank. The exact control movement depends on the glider and its control system.
Once the desired bank is established, the pilot normally reduces the initial aileron input. Further adjustments may be needed to maintain the selected bank or prevent it from increasing.
Rudder: Coordinating the Turn
The rudder controls yaw, which is the movement of the glider’s nose from side to side.
During a turn, the rudder helps coordinate the glider’s movement with its bank. Correct coordination reduces unnecessary sideways movement and drag.
Rudder input is particularly important when rolling into or out of a turn because aileron movement can create an unwanted yawing effect known as adverse yaw.
Elevator: Managing Pitch and Airspeed
The elevator controls pitch, helping the pilot manage angle of attack and airspeed.
In a coordinated turn at constant airspeed and altitude, the glider generally needs a greater angle of attack to generate the additional lift required. The pilot achieves this through appropriate elevator input, often involving gentle back pressure on the control stick.
The amount of input depends on the bank angle, airspeed, aircraft characteristics and flight conditions. Excessive back pressure can bring the glider closer to a stall, so the pilot must manage the manoeuvre rather than simply pulling harder.
Together, the ailerons, rudder and elevator allow the pilot to control the bank, coordinate the turn and manage airspeed.
How to Turn a Glider: Entering the Turn
Before beginning a turn, the pilot needs to establish that the manoeuvre can be carried out safely.
Clear the Airspace
A proper lookout is essential. The pilot should scan the intended direction of turn and check for other aircraft before changing the glider’s flight path.
A clearing turn may be appropriate before practising manoeuvres, according to the training procedure and local conditions. The pilot should also remain aware of traffic that may enter the area after the initial check.
Establish the Bank
The pilot applies aileron towards the intended direction of turn. As the glider begins to roll, coordinated rudder input helps counteract adverse yaw.
The bank should be established smoothly. Large or abrupt control movements can create rapid changes in roll and make it harder to achieve the desired attitude accurately.
Coordinate Aileron and Rudder
Aileron input changes the lift and drag produced by the wings. If the pilot applies aileron without appropriate rudder coordination, the nose may initially yaw away from the intended direction.
The rudder helps counteract this effect. The goal is a smooth entry in which the glider rolls into the bank without unnecessary yaw or sideways movement.
The correct relationship between the controls varies with the aircraft and the stage of the manoeuvre. Pilots learn the appropriate control pressures through flight instruction and practice.
Adjust Pitch and Airspeed
As the bank increases, the vertical component of lift decreases for a given total lift. If the pilot does not generate enough total lift to support the glider’s weight, the glider may begin to descend.
During a level turn, the pilot generally needs to increase the angle of attack through appropriate elevator input while monitoring airspeed.
The objective is not to pull the nose up sharply. It is to make the coordinated adjustments needed to achieve the desired flight path and speed.
Coordinated Turns and Adverse Yaw
One of the most important glider turning techniques is learning to coordinate the ailerons and rudder.
When a glider begins a left turn, the right wing becomes the outside wing. During the initial roll, the right aileron moves down while the left aileron moves up.
The lowered aileron increases the camber of the right wing section. This generally increases its lift. Because induced drag increases with lift, the outside wing also experiences additional induced drag. The resulting difference in drag creates a yawing moment that tends to turn the nose to the right, opposite the intended left turn.
This is called adverse yaw.
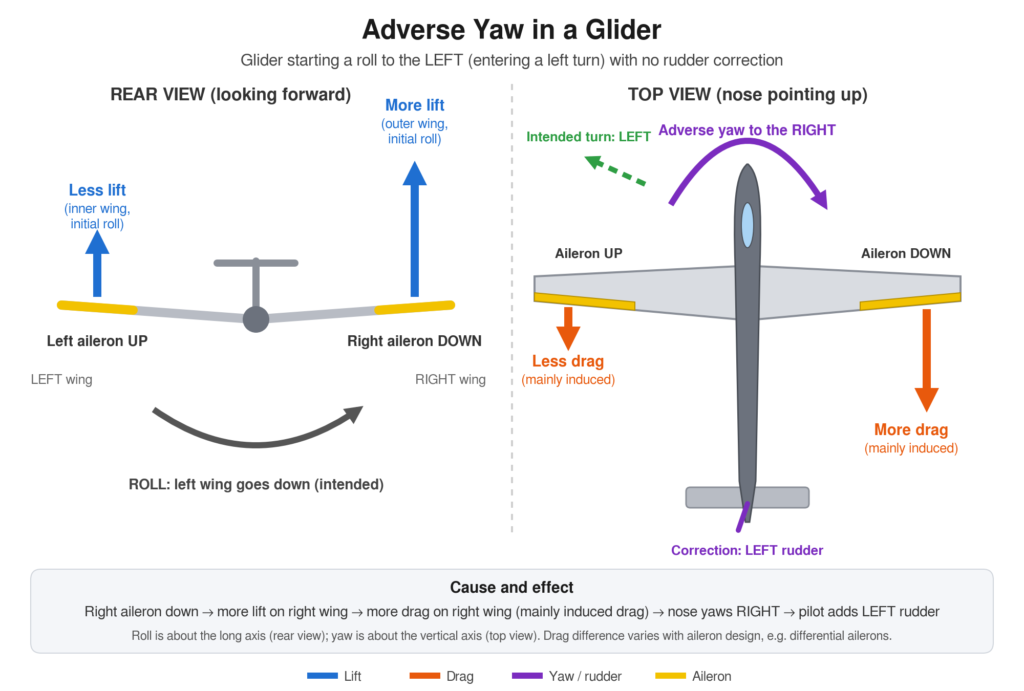
The effect can make a turn less efficient if it is not corrected. Coordinated rudder input helps the nose move in the intended direction while the glider rolls into the turn.
Some gliders use differential ailerons. In this arrangement, the upward moving aileron may travel through a greater angle than the downward moving aileron. This can reduce the drag difference between the wings and help minimise adverse yaw.
Differential ailerons do not necessarily eliminate adverse yaw. The effect varies with aircraft design, control deflection and flight conditions.
Recognising Poor Coordination
Many gliders have a yaw string attached to the canopy. It responds to airflow over the canopy and gives the pilot a visual indication of yaw and coordination.
When the glider is properly coordinated, the yaw string generally streams straight back along the canopy. If it moves away from the centreline, the pilot should identify the cause and use the appropriate correction according to the technique taught for that glider.
Some aircraft also have a slip and skid indicator. Pilots should learn to interpret the instruments fitted to their own glider rather than relying on a rule that may not apply to every cockpit or flight condition.
Slip vs Skid: What Is the Difference?
A slip and a skid are both forms of uncoordinated flight. They describe different relationships between the glider’s bank, yaw and turning path.
| Feature | Slip | Skid |
|---|---|---|
| Basic condition | The glider slips towards the inside of the turn. | The glider slips towards the outside of the turn. |
| Relationship to bank | The bank is too great for the rate of turn. | The rate of turn is too great for the bank angle. |
| Possible control cause | Insufficient or late rudder input for the aileron being used. | Excessive rudder input for the aileron being used. |
These descriptions refer to a slipping or skidding turn, not every manoeuvre that involves sideways flight. A forward slip used during an approach, for example, is a different manoeuvre with a specific purpose.
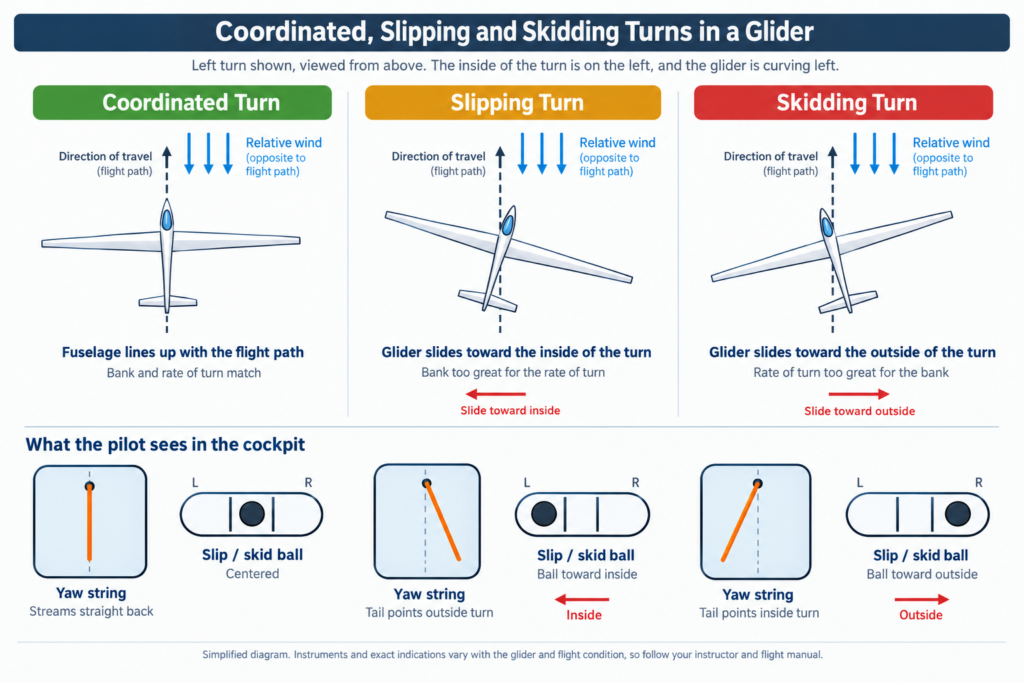
A slip or skid can result from the combined effects of bank, yaw and control inputs. It should not be diagnosed solely by assuming that one rudder input always produces the same result in every situation.
Both conditions can reduce performance by creating uncoordinated airflow and additional drag. A skidding turn is particularly hazardous at low airspeed and high bank. If the glider stalls while skidding, one wing may stall more deeply than the other, increasing the risk of entering a spin.
Bank Angle, Load Factor and Stall Speed
Bank angle is the angle between the glider’s wings and the horizontal.
A shallow bank produces a relatively gentle turn. A steeper bank generally produces a stronger horizontal component of lift, allowing the glider to turn more tightly at a given airspeed.
However, increasing the bank also increases the total lift required to maintain altitude in a coordinated level turn. The wings must support the glider’s weight while providing the force needed to turn.
This increases the load factor.
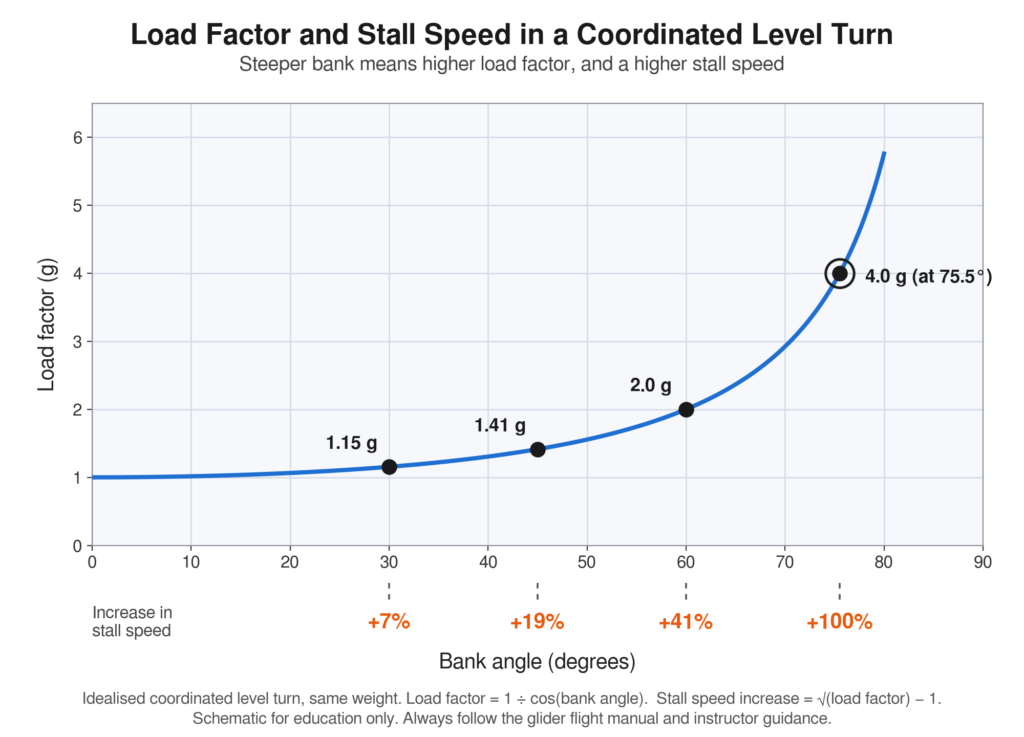
In an idealised coordinated level turn at a bank angle of 60 degrees, the load factor is approximately 2g. The wings must generate about twice the lift required in unaccelerated level flight.
Because stall speed increases with the square root of load factor, the stall speed at 2g is approximately 1.414 times the one g stall speed. That is an increase of about 41 per cent, assuming the same weight and other relevant conditions.
This is why a steep turn requires careful airspeed and angle of attack management. A glider that is safely above the stall in straight flight may have a much smaller margin above the stall at the same airspeed in a steep turn.
There is no single ideal bank angle for every glider turn. The appropriate angle depends on the purpose of the manoeuvre, airspeed, traffic, weather, aircraft limitations and pilot training.
Maintaining a Steady Turn: Overbanking Tendency
Once the glider reaches the desired bank angle, the pilot must maintain a stable flight path.
During a banked turn, the outside wing follows a larger circular path than the inside wing. It therefore travels faster around the turn and can generate more lift. This creates a tendency for the bank to increase, known as overbanking tendency.
The effect can occur in banked turns generally, but it becomes particularly important in steeper turns. It may be more noticeable in gliders with long wings, although the actual behaviour depends on the aircraft’s design and flight conditions.
To maintain the selected bank, the pilot may need to apply a small amount of opposite aileron. The amount depends on the glider and the situation. Appropriate rudder coordination may also be needed as the aileron input changes.
Managing Airspeed
Airspeed should be monitored throughout the turn. In a coordinated level turn, increasing bank increases the lift requirement and load factor. If the pilot does not make the necessary adjustments, the glider may descend or lose airspeed.
Increasing bank does not automatically increase airspeed. Airspeed depends on the glider’s energy state, pitch, drag and flight path. A descending turn may lead to an increase in airspeed if the pilot does not manage it appropriately.
Managing Height
A glider loses energy to drag as it flies. In a turn, the increased lift requirement can produce additional induced drag. As a result, the sink rate may be greater than in straight flight under otherwise similar conditions.
The pilot needs to balance the desired turn with the available height, airspeed and energy. A turn should not be continued simply to achieve a particular heading if the flight situation requires a different response.
How to Roll Out of a Turn
Rolling out means returning the glider to wings level and stopping the turn at the desired heading.
The pilot applies coordinated aileron and rudder inputs to reduce the bank. As the wings approach level, elevator input is adjusted as necessary to maintain the desired airspeed and flight path.
The rollout should begin before the glider reaches the intended heading because the aircraft continues turning while it remains banked.
A commonly taught rule of thumb is to begin the rollout with a lead of approximately half the bank angle. For example, with a 30 degree bank, the pilot might begin rolling out about 15 degrees before the target heading.
This is a guide, not a universal rule for every glider. The appropriate lead depends on the aircraft’s roll response, bank angle, airspeed and control technique.
As the wings return to level, the pilot checks the heading, airspeed, attitude and surrounding traffic. Smooth control inputs help prevent the glider from overshooting the desired heading or rolling into an unwanted bank in the opposite direction.
Understanding Turn Rate and Turn Radius
Two useful concepts explain how a glider’s turn changes with speed and bank angle.
Turn rate describes how quickly the glider changes heading, usually measured in degrees per second.
Turn radius describes the size of the curved path followed by the glider.
In a coordinated level turn, for a given bank angle, turn rate decreases as true airspeed increases. In simplified terms, turn rate is inversely proportional to true airspeed.
Turn radius behaves differently. At the same bank angle, turn radius is proportional to the square of true airspeed.
This means that a 10 per cent increase in true airspeed produces approximately a 21 per cent increase in turn radius, because 1.1 squared equals 1.21.
The relationship helps explain why a faster glider needs more space to complete a turn at the same bank angle. A slower glider can follow a tighter turn under suitable conditions, provided it remains safely above the relevant stall speed and within its operating limits.
These relationships assume a coordinated level turn and do not replace the aircraft’s flight manual or instructor guidance.
Turning in a Thermal
Thermal soaring is one of the most familiar reasons glider pilots make repeated turns.
A thermal is a rising region of air that can provide the lift needed to maintain or gain altitude. To remain in the rising air, the pilot may circle within the thermal while monitoring bank, airspeed, vertical movement and the glider’s position.
The objective is to find a suitable part of the rising air and maintain a coordinated circle within it. The best bank angle and circle size depend on the thermal’s characteristics, the glider’s performance, airspeed and surrounding traffic.
A turn that is too wide may take the glider away from the stronger lift. A turn that is too tight can increase load factor, stall speed and induced drag.
Thermal turns also require an effective lookout. Other gliders may be circling in the same thermal, so pilots must follow applicable right of way rules and established local procedures. In many gliding environments, pilots joining an established thermal follow the direction already being used by the gliders in it. However, the applicable rules and local procedures take precedence, and pilots must maintain separation and lookout at all times.
Common Mistakes When Turning a Glider
Understanding the theory is only the beginning. A pilot also needs to recognise common errors and learn how to avoid them.
Using aileron without coordinating the rudder. This can produce adverse yaw and reduce the efficiency of the turn.
Applying excessive rudder. Too much rudder can cause a skid. A skidding turn at low airspeed and high bank can become dangerous if the glider stalls and enters a spin.
Allowing the bank to increase unintentionally. Overbanking tendency can make the turn progressively steeper unless the pilot makes appropriate corrections.
Ignoring airspeed. A steep turn increases the lift requirement and load factor. The pilot must monitor airspeed and maintain an appropriate margin above the stall.
Pulling back too aggressively. Excessive elevator input can increase angle of attack and bring the glider closer to a stall.
Looking inside the cockpit for too long. Instruments are useful, but pilots must continue to scan the surrounding airspace and use outside references.
Beginning the rollout too late. Since the glider continues turning while banked, a late rollout can result in overshooting the intended heading.
These errors are best addressed through structured practice with a qualified gliding instructor. The correct control inputs depend on the glider and the flight conditions.
Glider Turning Techniques for Beginners: How to Improve
Developing good turning technique takes time. The goal is to make smooth, coordinated control inputs while maintaining an accurate understanding of the glider’s attitude and flight path.
First, learn to recognise the relationship between bank angle and turn direction. Observe how the horizon appears to change as the glider rolls into and out of a turn.
Next, develop coordination between aileron and rudder. Pay attention to the yaw string or the aircraft’s installed slip and skid indicator, and learn how the controls work together.
Then, monitor airspeed and pitch throughout the manoeuvre. A turn is not complete simply because the glider has reached the desired heading. It must also remain within safe flight parameters.
Finally, practise accurate rollouts. Anticipating the desired heading and reducing the bank smoothly help build precision and confidence.
Good glider turning techniques for beginners are not about making the tightest possible turn. They are about understanding the aerodynamics, using the controls correctly and maintaining safe, coordinated flight.
Frequently Asked Questions
Final Thoughts
A well flown turn is more than a change of direction. It is a controlled balance of bank, lift, yaw, pitch and airspeed.
The most important glider turning techniques begin with understanding why the glider turns, how the three primary controls work together and why coordination matters. From there, pilots can develop a better feel for bank angle, manage overbanking tendency, anticipate the rollout and make informed decisions when circling in a thermal.
These skills develop through practice, observation and a sound understanding of the aircraft’s behaviour. Smooth, coordinated turns help pilots use the glider’s performance effectively while preserving the safety margins needed for good airmanship.
Further Reading
FAA Glider Flying Handbook
The Federal Aviation Administration’s handbook provides detailed guidance on glider aerodynamics, flight manoeuvres, performance and soaring techniques.
Read the FAA Glider Flying Handbook.
NASA: Banking Turns
NASA explains how banking changes the direction of lift and creates the horizontal force required for a turn.
Read NASA’s explanation of banking turns.
If you are new to the sport, explore our gliding basics guide to build a solid foundation in the principles of glider flight before moving on to more advanced turning techniques.
Safety Note
This article is intended for general educational purposes. It does not replace practical flight instruction, the glider flight manual or the procedures established by a gliding club or training organisation. Always follow the aircraft’s operating limitations and learn turning manoeuvres under the supervision of a qualified instructor. Maintain a clear lookout and understand stall and spin awareness, particularly when turning at low airspeed or using a steep bank.